So far we’ve created a Class Notebook *link* and made the first page our own *link*. Now we’re going to provide some content for the students.
The _Content Library is where all YOUR stuff goes; it’s the Teacher space. We used to have to photocopy material we wanted to give to students. And then, for students who weren’t present or who lost theirs, we used to have binders at the front of the room, file folders or those little plastic boxes to hold extras. Now, we just put one copy in the Content Library and send it out to the Students — if they destroy their copy, or just want another copy to work on, they can always grab another copy from the Content Library (since they can’t change anything in the Content Library, when they pull a sheet out, they’re only grabbing a copy).
So… in your _Content Library, clear out all the material that Microsoft has put in and create your first tab. Right-click the “Getting Started” tab and choose Delete and then click on the PLUS sign and add your first section. I called mine “Course Info” — I’ll put my course information sheet, contact information , office hours, textbook, etc. in there.

Now, I already wrote my Course Information sheet in Word (our school provides us with a template to fill in). I am NOT going to copy & paste it into OneNote. Instead, I’m going to use the “Insert Printout” to get an exact copy of what’s in Word, as if I handed them it on paper.
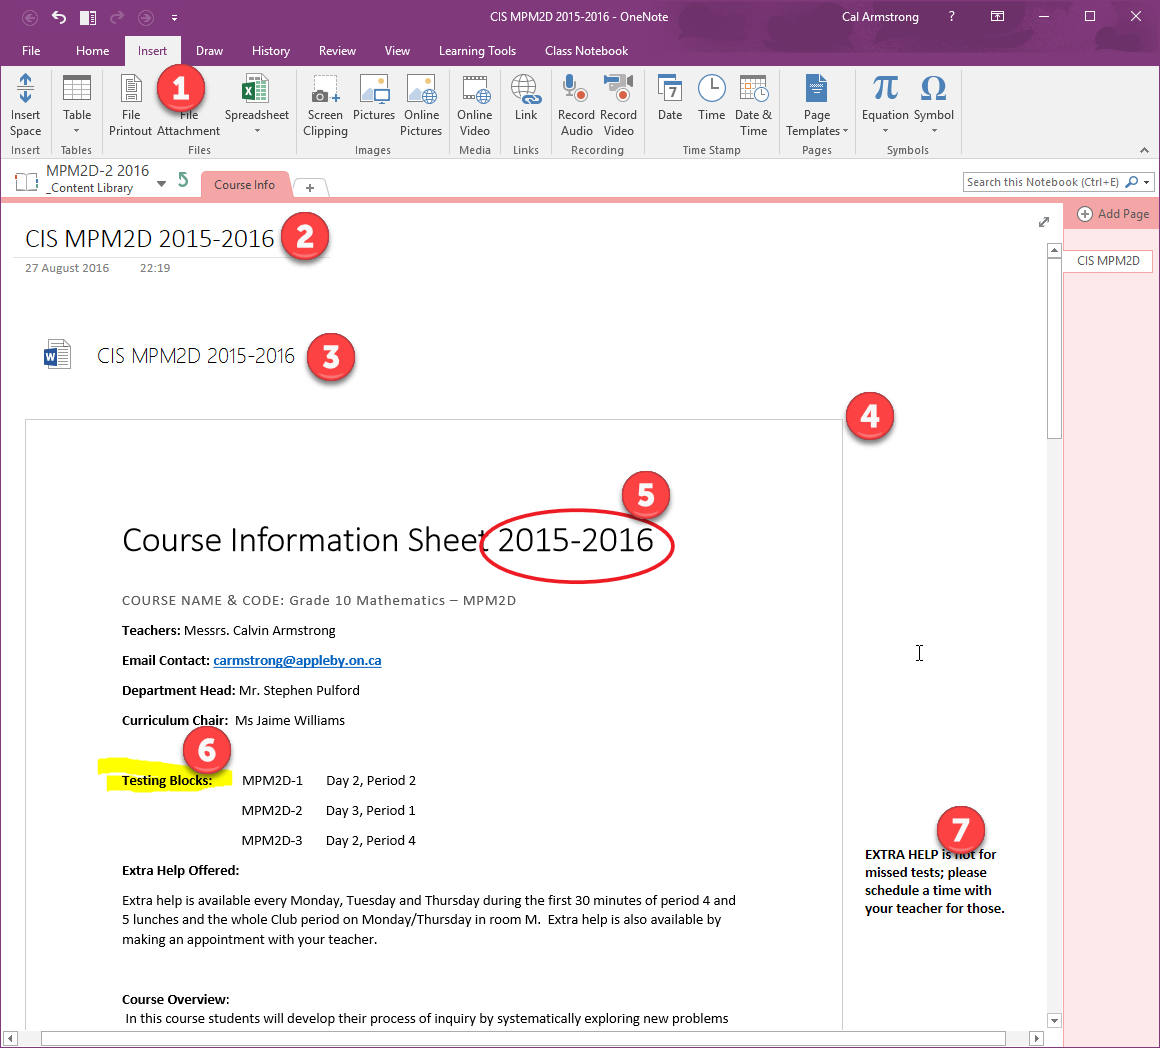
So, go to the INSERT ribbon and choose FILE PRINTOUT (that would be the “1”) … you’ll get a pop-up window asking you to find the file. Once you select the file and click INSERT, it’ll take a few seconds and then (2) the page will be renamed with the filename and (3) a copy of the actual file will be embedded in the page (so if you or the student double-clicked on the Word icon, it would open it up in Word) and (4) a printout of all the pages in the file will appear. Since OneNote pages go on forever, regardless of how long the document is, you’ll just get page after page (there is an option in Settings to put actual pages on different OneNote pages but that’s seldom what you want). You can add comments to the printout by using your pen (5), highlighting (6) or typing (7). Since this is a printout, you can’t change what’s actually on the “page” — which can be a good thing if this is a fill-in for students!
For the record, Insert Printout is the best way to use material you already have in Word, PowerPoint, PDF or other formats. It gives the students an exact representation of what they would have received on paper. Of course, when you have more time, you can re-create it in the free space of OneNote but remember, use your time wisely — it’s likely more effective to spend time giving them feedback than worrying about what things look like.
Now, you can go ahead and add more pages to this section, as many as you’d like in fact. We’ve found it good practice to not add more pages than fit on a regular computer screen (so maybe 20-25 pages). You can organize your pages into sub-pages (right-click the name of the page on the far right and choose “Make Subpage”) but again, if you get too many, it isn’t helpful.
Here’s an example below… the teacher’s first section “Course Foundations” is all about the course, she’s printed out the Course Information sheet and then added pages & sub-pages to give other important course tidbits. Her next section is the “Diagnostic” they start the course with, then the next tab is the first book they read, “The Things They Carried”, and so on.

So, you can break your content up into logical sections. How you do that is up to you, based on your course. I thought I’d provide a few images from the top of our teachers’ OneNotes after they’re done a complete year showing all the tabs (sections) that they’ve used. Think of these as the Hilroy binder separators that we used to use when we had paper. These are high school courses but do notice the variety of approaches.
This first one is mine. Now, I’m a mathematics teacher, so I tend to build my course linearly, starting with Unit 0 and working slowly to the Exam.
 This next one is French — it’s one of the few that work thematically, so they build across Ressources, Vocabulaire and Lecons on any given day rather than building on one unit and then moving to the next.
The next few are from English, Social Science and Chemistry courses — they seem to work like Math in that they work on a piece of writing and then move on to the next.


This last one is from Music. Like French, it is built across several tabs at a time and on any given day, students may be working in different sections.

So far we’ve done:
Creating your first OneNote Class Notebook
The first page of your Class Notebook
Putting content in your Class Notebook (this post)
Giving content to students
Distributing content in your Class Notebook (the video)
Facilitating Feedback in OneNote (Review Student Work)
